If you're using Adobe Photoshop (I'm using the ancient PS7) to edit and print your photos, invitations, etc., the easiest way to handle color management is to let Photoshop do it for you instead of your Canon printer. Here's how you can adjust the settings of your printer and Photoshop for best photo prints or if you want the colors on your screen to match the printouts.
#1:
First of all, we need to disable color management on our Canon printer.
Go to Control Panel -> Printers and Faxes
Right click on your Canon printer and choose Printing Preferences (we're doing this so it'll be a permanent/default setting).
 #2:
#2:On the Main tab, select Manual under Color/Intensity and click on the Set button.

#3:
Under Color Adjustment, make sure everything is at 0.
 For the Brightness setting, you can actually change this if you want to, especially when you're printing dark or dim images. You can choose Light if you want to or Dark if the photo is too bright. I just use Light or Normal.
#4:
Go to the Matching tab and choose None for color correction. This is how you disable the color management on your Canon printer.
If you don't like the print results of your documents on Word, etc., you can always change it back to Driver Matching when printing documents.
 Now, click on Okay until all the windows of Printing Preferences are closed.
#5:
Open Adobe Photoshop.
Click on View on the main menu -> Proof Setup -> Select Custom.

On the Proof Setup window, select Adobe RGB (1998) under Profile menu. Then, click on OK.

This will ensure that what you see on your screen is also on Adobe RGB color profile.
#6:
Open the image you want to print through Adobe Photoshop.
For PS7, click on File -> Print with Preview.
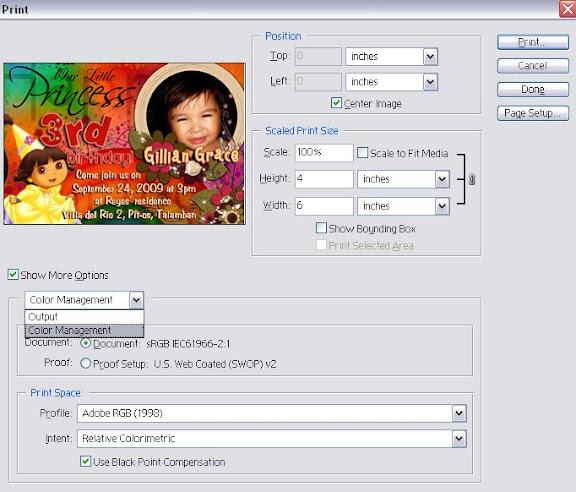
You'll get the window below. Now, make sure all the other settings are correct (print size, page setup, etc).

At the bottom of the window, under Show More Options checkbox, you'll see a drop-down menu with Output as the default selection. Click on it and select Color Management.
Then, under Print Space, select Adobe RGB (1998) for Profile.
This should be available as an option for Canon printers as this is included in the installation of the printer drivers. If you don't see this, you might have not included this during installation so you have to go back to the installer and just install Adobe RGB.
For CS+, click on File -> Print.
You'll see a window like the one below.

On the right side, under Color Handling, select Photoshop Manages Colors.
Then, make sure under Profile that Adobe RGB (1998) is selected.
#7:
That's it. Now you can try to print your photos or any project on Photoshop and the colors that you see on your screen would be closest to the print quality/output.
Now, if you still encounter some color issues, I suggest you do some maintenance on your printer. Make sure you already did printhead alignment before you even started printing.
All my printouts with our Canon iP3680 that's now on CISS are as vivid as what I see on my screen.
Hope this helps!
Nice instructional blog! i will bookmark this page :)
ReplyDeleteVery nice explanation. Thank u very much. I have very much impressed.
ReplyDeleteSnapfish Offers
the color not the same if i use different type of glossy paper
ReplyDelete